VisIt Quick Tutorial
Precompiled serial versions of Visit can be downloaded from the
Visit homepage.
A working parallel version of Visit 1.4.5 is available on the
ASAP cluster? in the directory
/home/tools/visit. To use it, add the following settings to your shell environment
Setup
- Path for backend compute engine (required)
-
export LD_LIBRARY_PATH=/home/tools/visit/1.4.5/linux-intel/lib:$LD_LIBRARY_PATH or setenv LD_LIBRARY_PATH /home/tools/visit/1.4.5/linux-intel/lib:${LD_LIBRARY_PATH}
- Plugins (required)
-
export VISITPLUGINDIR=/home/tools/visit/1.4.5/linux-intel/plugins or setenv VISITPLUGINDIR /home/tools/visit/1.4.5/linux-intel/plugins
- Path for frontend executable
visit (optional)
-
export PATH=/home/tools/visit/bin:$PATH or setenv PATH /home/tools/visit/bin:${PATH}
Usage
 |
- Start VisIt
-
visit or /home/tools/visit/bin/visit
|
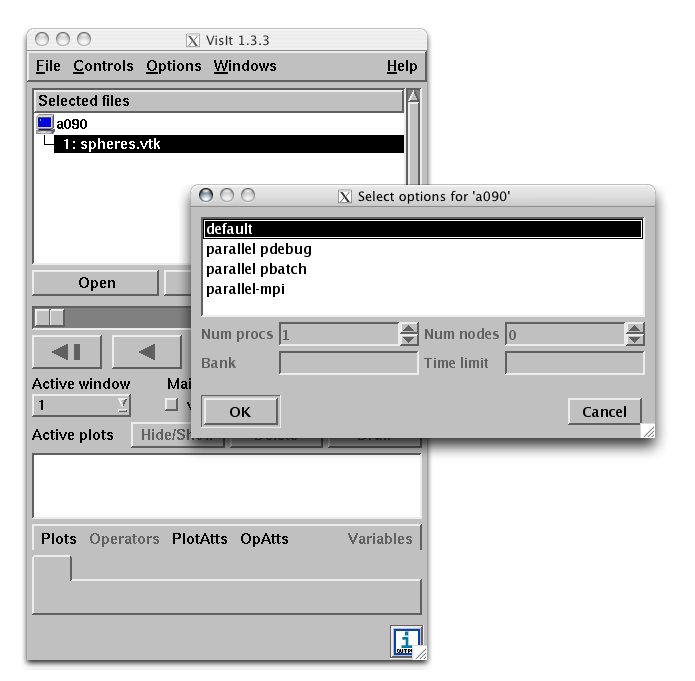 |
- On the main Visit window, on the Files pane, select the file you want to open
- then click
Open
- AMROC data can be converted with hdf2file into VTK format (.vtk,
Filetype 10 or 11), SILO format (.silo, FileType 15) and Tecplot format (FileType 8)
- Note that conversion into the SILO format (.silo,
FileType 15) is only possible when SILO_DIR has been specified as an argument for vtf/configure or is set in vtf/setup. See InstallationConfiguration? for the appropriate setting on the directly supported machines.
- ASCII Tecplot files (.dat,
FileType 8) should be node-centered (Type 1, the default setting) and have to be renamed to .tec to utilize the Tecplot import filter in Visit. This filter can currently not read binary Tecplot files (.plt).
|
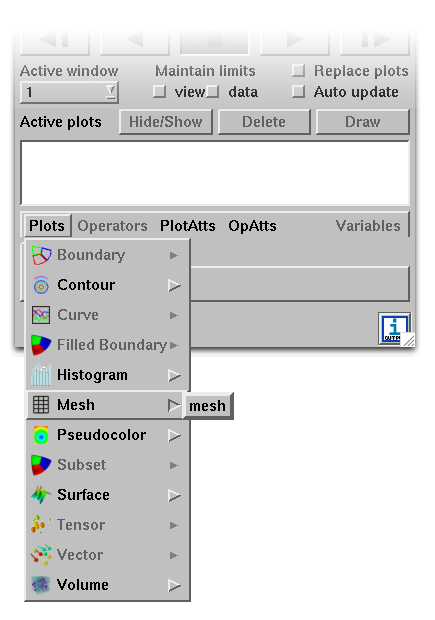 |
- Select the plot you want to create from the
Plots pane
|
Parallel Execution
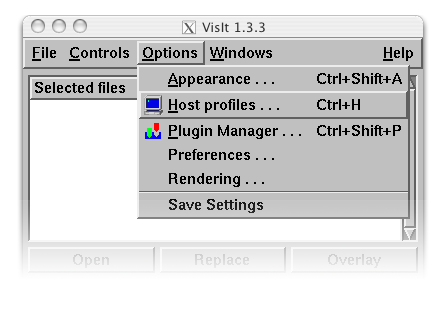 |
- Go to the
Options menu, select Host Profiles.
|
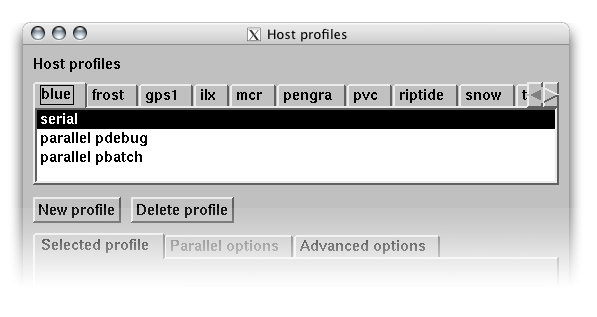 |
- Delete all
Blue profiles.
- Otherwise similar node naming as asap will cause conflicts!
|
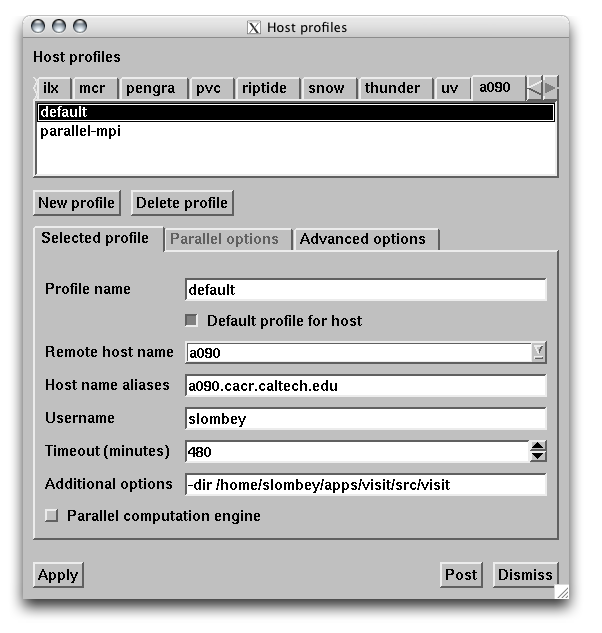 |
- Create profile for ASAP
- Activate parallel execution by enabling the button
Parallel computation engine.
- Set
Remote host name to asap.cacr.caltech.edu.
- Under
Parallel options specify mpirun as Parallel launch method.
- Under
Advanced options select Use local machine name.
- No further settings should be required. Click on
Apply.
- Dismiss the window and save your settings by selecting
Save Settings from the main Options menue.
- The next time you open a file, the parallel compute engine will be launched. Before starting the parallel engine, a window will be displayed asking for the number of ASAP nodes to run on. A further window will then indicate the
compute engine launch process.
|
Remote Execution
Visit can also be used through a server running remotely on another machine. This server itself can be a serial compute engine or the frontend to a parallel one. To use Visit 1.4.5 with a remote server running on
asap.cacr? do the following:
- Download Visit 1.4.5 from the Visit homepage and install it on your local workstation.
- Make sure that you can use
ssh to connect from your local workstation to asap.cacr.caltech.edu.
- Make sure that your default shell environment on
asap.cacr.caltech.edu contains the above PATH setting to allow the execution of visit immediately after a login.
- To use Visit remotely, start
visit as described above on your local workstation.
- If you have a Fedora-Core 3 or very recent RedHat Linux workstation, start the program with the additional option
-nopty in the foreground. With this option, any necessary password has to typed on the shell console from which the program is run. Without the option -nopty Visit would display a separate window asking for passwords, but this feature is not functional on very recent Linux system. See the explanation under Trouble shooting. The option -nopty leads to a program hang, when given to a visit program running in the background (i.e. started with &), the moment a password is required. Only start the program as: visit -nopty
- When started with
-nopty Visit will display the Metadata server launch progress window immediately. If a password is necessary, you have to activate the original console window then and provide the password.
- Create a local
Host Profile for asap.cacr.caltech.edu as described above, but this time select under Advanced options select Parse from SSH_CLIENT variable and Specifiy SSH port=22. As this profile will be stored on your local computer it will not interfer with any profile previously created directly in your account on asap.cacr.caltech.edu.
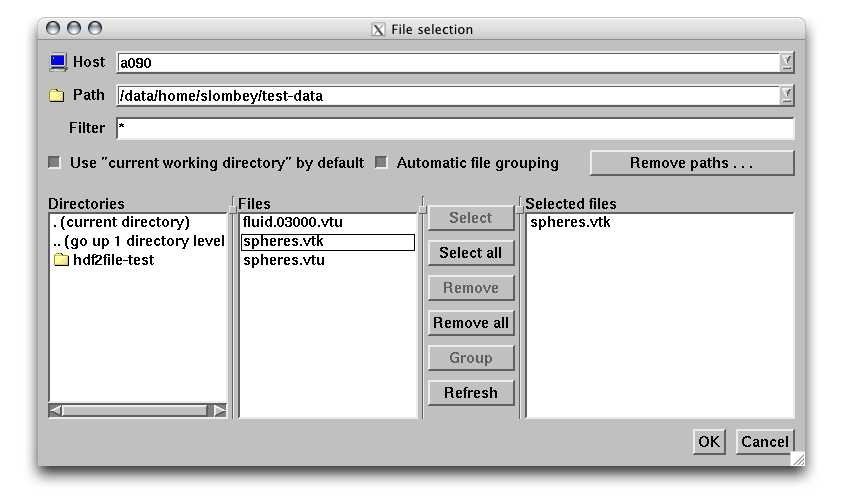 |
- To connect to the remote server, go to the file menu: select
Select File..
- from the
Host pulldown, select the server asap.cacr.caltech.edu
- If the connection succeeds, you can then browse through your files on ASAP and visualize them directly. No file needs to be pulled over via
scp to your local machine!
- Connection problems can be diagnosed via the stdout in your local terminal from which your local Visit client was started.
|
Note: You may encounter difficulties with remote execution of Visit on
asap if your default shell on
asap is
bash. When
bash is configured as a symbolic link to
sh, as it is on
asap, the shell does not automatically process any user configuration files such as
.profile to set up the environment unless a special command-line flag is given to
sh. It appears that the ssh client used by Visit to launch remote commands does not know how to issue this option to
sh when it sends a command, so the command does not execute in the user's normal interactive environment. This causes the remote launch of the metadata server to fail. At this time, we have not discovered any workaround for this problem, other than to use a different shell such as
csh or
tcsh on the
asap machine.
The standard Visit 1.4.5 installation already contains
Host profiles for all current machines at Lawrence Livermore National Labs, especially for ALC, Thunder, and uP. I have been able to connect successively to all ASC machines at LLNL through the Visit interface under Linux and Windows by opening an IPA connection to my local system before.
RalfDeiterding (4 Jan 2006)
In order to use this feature you have to modify all predefined
Host profiles as follows:
- Activate the
Host profile you want to modify
- Under
Selected Profile adjust your Username appropriately for the remote machine.
- Under
Advanced options select Specify SSH port and put the same secret ssh-port number in here that you also use always when connecting to LLNL machines.
- If you are using Visit through VPN do additionally the following (this might have to be verified - RalfDeiterding (4 Jan 2006)):
- Under
Advanced options select Use local machine name or use Specify manually and put the full hostname or IP address of the local machine in here. With the setting Parse from SSH_CLIENT variable the IP address of the VPN server, through which you are connecting, will be used otherwise as -host for the remote Visit data server. In this case, no connection can be established.
- Save all settings as described above and choose the remote server you want to connect. On infrequently used systems you should check that the settings for parallel execution (queue names, etc.) are still recent.
Remote Execution under MS Windows XP
- Download the Visit 1.4.5 self-installing program for Windows from the Visit homepage and run it to install Visit on your local PC.
- Disable blocking by Windows XP Firewall software of specific ports used by Visit to exchange data between the metadata server on the remote machine and the local Visit client.
- The first time you run Visit on your local PC, Windows might indicate that the Windows Firewall is blocking certain ports used by Visit for remote execution.
- Click on
Unblock in the dialog box to allow the Visit program to access these ports or disable the firewall temporarily.
- Now follow the procedure for Remote Execution as described in the preceding section.
- You can connect to all system that use password authentication (e.g. all LLNL machines and DataStar).
- Note that the host profiles for the LLNL machines are stored in the file
visit-config-open. Copy the fields "HostProfile" for the machines you like to access into your local config for [USERNAME] file.
Connecting to a Remote Server (e.g. asap.cacr.caltech.edu) with ssh-key Authentication under MS Windows XP
- Make sure that you can use an ssh client for Windows such as PuTTY, TTSSH2 or the non-commercial Secure Shell 3.2 to connect from your local PC to
asap.cacr.caltech.edu.
- For example, using the PuTTY program
puttygen you can generate an ssh public/private key pair.
- Reformat the public key suitably for Unix by removing line breaks in the encoded key and placing the key label at the end.
- Place the public key in your
authorized_keys file on asap.
- Use the PuTTY program
pageant (PuTTY authentication agent) on your local PC to load the ssh key you have generated. When running, this tool will create an icon in the Windows XP taskbar. Click on it to add the required key.
- You should then be able to run
putty and connect to asap.cacr.caltech.edu using your key.
- Whenever you want to use remote Visit to connect to the server with ssh-key authentication, make sure that
pageant is running with the appropriate key as described above.
- Visit uses the tool
qtssh.exe (located in the Visit directory) which is compatible with pageant. Without running pageant in the background the command line window will display the message No supported authentication methods left to try!
- There might be a problem on asap.cacr.caltech.edu with this feature when using the bash as login shell. RalfDeiterding (4 Jan 2006)
Trouble shooting
- All stdout/stderr output during the connection can be monitored in the console from which the local Visit program has been started.
- When connecting to a remote host, you should see the same login messages as when using
ssh to connect to the remote system.
- After a successful login, the metadata server will be started (this requires having
visit/bin in PATH or specifying the visit directory for instance as -dir /usr/gapps/visit under Additional Options in the Host profile). The message should be something like Running: vcl1.4.5 -host 131.215.145.30 -dir /usr/gapps/visit -timeout 480 -dir /usr/gapps/visit -port 5603.
- The IP address or hostname after
-host has to be the local machine. Check this first, especially when using VPN.
- Make sure that it is possible to connect from the remote server via the port specified after
-port to your local machine. You should first verify that you can use ssh to connect from the remote machine back into your local machine. But if the connection still fails, ask your administrators, if a connection via the specified port to your local system is actually possible. The relevant ports are 5601, 5602, 5603, ....
- Started without any options, Visit uses the old Unix devices
/dev/pty to capture remote ssh prompts, e.g. to ask for passwords. Make sure that these devices are functional on your local workstation (make sure that pty* files exist under /dev). If they don't (as on the most recent Fedora Core 3 by default, see error output in terminal window from which the local Visit was started), you have to run visit with the additional option -nopty. In this case, all passwords have to typed in the console window from which visit -nopty was launched. Note that the option -nopty causes the program to hang when the program is running in the background and Visit doesn't have exclusive access to stdin.
Compilation
ASAP has the latest binaries of VisIt. However if for some odd reason you insist you want to compile your own VisIt, then visit
http://www.cacr.caltech.edu/~slombey/asci/visit/
Host Profiles for other Machines
DataStar?
| Remote host name | dspoe.sdsc.edu |
| Additional options | -dir /gpfs/projects/asci/caltech/visit |
| Parallel computation engine | YES |
| Parallel launch method | poe |
| Additional launcher arguments | -tasks_per_node 4 -euilib us -euidevice sn_all |
| Partition/Pool | 1 |
| Default number of processors | 4 |
| Default number of nodes | 1 |
| Default Time Limit | 30m |
| Parse from SSH_CLIENT environment variable | YES |
| Specify SSH port | 22 |
On DataStar the poe-parameter
-tasks_per_node is mandatory. Unfortunately, Visit does not consider it yet. Therefore, the user has make to sure himself that the relation [nodes]*[tasks_per_node]=[processors] is always satisfied. Interactive jobs typically run on 8-way nodes. A 16-way job would have to be specified as [nodes]=2, [tasks_per_node]=8, [processors]=16. In principle, poe doesn't require such a redundant specification, but it's currently unavoidable with Visit.
DataStar - Head node?
| Remote host name | dslogin.sdsc.edu |
| Additional options | -dir /gpfs/projects/asci/caltech/visit |
| Parallel computation engine | NO |
| Parse from SSH_CLIENT environment variable | YES |
| Specify SSH port | 22 |
--
SantiagoLombeyda,
RalfDeiterding - 14 Dec 2005


